Analyzing, visualizing and optimizing JS bundle size in Rails/Webpacker apps
Since the moment Rails embraced the JavaScript ecosystem, it has quickly become super easy to be productive with JavaScript toolset. Productivity, the new ecosystem (often unfamiliar to Rails developers specialized in the back-end), and magic of Rails configuration made JS code a big, opaque box that “just works” and doesn’t seem to need to be understood. Lack of understanding has consequences, one of which is bloated JavaScript bundle.
In this article, we’ll create a Rails app with a simple React component using the most typical stack, analyze the bundle size and try to optimize two common reasons for size inflation.
Creating the project
rails new optimize_webpack_bundle_size --webpack=react
cd optimize_webpack_bundle_size
rails db:migrate
While Rails with webpacker does support rendering React components out of the box, react-rails gem provides additional helpers, generators, and elegant hooks. Let’s add it to the Gemfile:
gem 'react-rails'Next, install the gem:
bundle install
rails generate react:install
Finally, clean up the project by deleting app/javascript/packs/hello_react.jsx file and removing console.log('Hello World from Webpacker') line from app/javascript/packs/application.js.
Generating React component
We’re going to implement a component that displays match results. It will receive match date and score, and will format the date in relative format and pick the winning team.
To make sense of the purpose of this tutorial, let’s use external dependencies to pick the winning team (lodash) and format the relative date (moment) to inflate our JS bundle a little bit:
yarn add moment lodashTime to generate the component:
rails g react:component MatchResults date:string teamScores:array
mv app/javascript/components/MatchResults.js app/javascript/components/MatchResults.jsx
Our component will be so simple it will not contain any state – so it makes the most sense to implement it as a functional stateless component: not a class but a function taking just one argument: props. Since we already know which properties the component will use, we can destructure the argument.
import React from "react";
import PropTypes from "prop-types";
import _ from "lodash";
import moment from "moment";

export default function MatchResults({ date, teamScores }) {
  const relativeDateDescription = moment(new Date(date)).fromNow();
  const winningTeam = _.maxBy(teamScores, (t) => t.score);

  return (
    <p>
      {winningTeam.name} won the match {relativeDateDescription}, scoring{" "}
      {winningTeam.score} frags.
    </p>
  );
}

MatchResults.propTypes = {
  date: PropTypes.string.isRequired,
  teamScores: PropTypes.arrayOf(
    PropTypes.shape({
      name: PropTypes.string.isRequired,
      score: PropTypes.number.isRequired,
    }),
  ).isRequired,
};
Finally, we have to generate a controller to display our component:
rails g controller pages indexHere’s how app/views/pages/index/html.erb will look like:
<%= react_component "MatchResults", {
    date: 96.hours.ago.to_date,
    teamScores: [
      {name: "Blue Team", score: 2},
      {name: "Red Team", score: 3}
    ]
} %>
Remember to plug this view to config/routes.rb:
Rails.application.routes.draw do
  root to: 'pages#index'
end
Also, include the JS pack in application layout:
<head>
  ...
  <%= javascript_pack_tag 'application', 'data-turbolinks-track': 'reload' %>
</head>
Our app is ready to run:
That’s a pretty unimpressive, hello-world-like app with two small libraries. Hopefully, the JS bundle ends up being relatively small. Let’s check it out.
Visualizing the JavaScript dependencies
Webpack has built-in size profiler and can provide a JSON file with all information we need:
node_modules/.bin/webpack --config config/webpack/production.js --profile --jsonUnfortunately, the resulting file is huge, and it’s impossible to analyze it manually. That’s why it makes the most sense to visualize this data. We’ll do it using webpack-bundle-analyzer:
yarn add webpack-bundle-analyzer --devNow we can generate stats file and point it to the analyzer:
node_modules/.bin/webpack --config config/webpack/production.js --profile --json > stats.json
node_modules/.bin/webpack-bundle-analyzer stats.json
This operation will open the web browser with a simple application allowing you to analyze the JavaScript dependencies visually. Feel free to scroll and zoom in for greater detail!
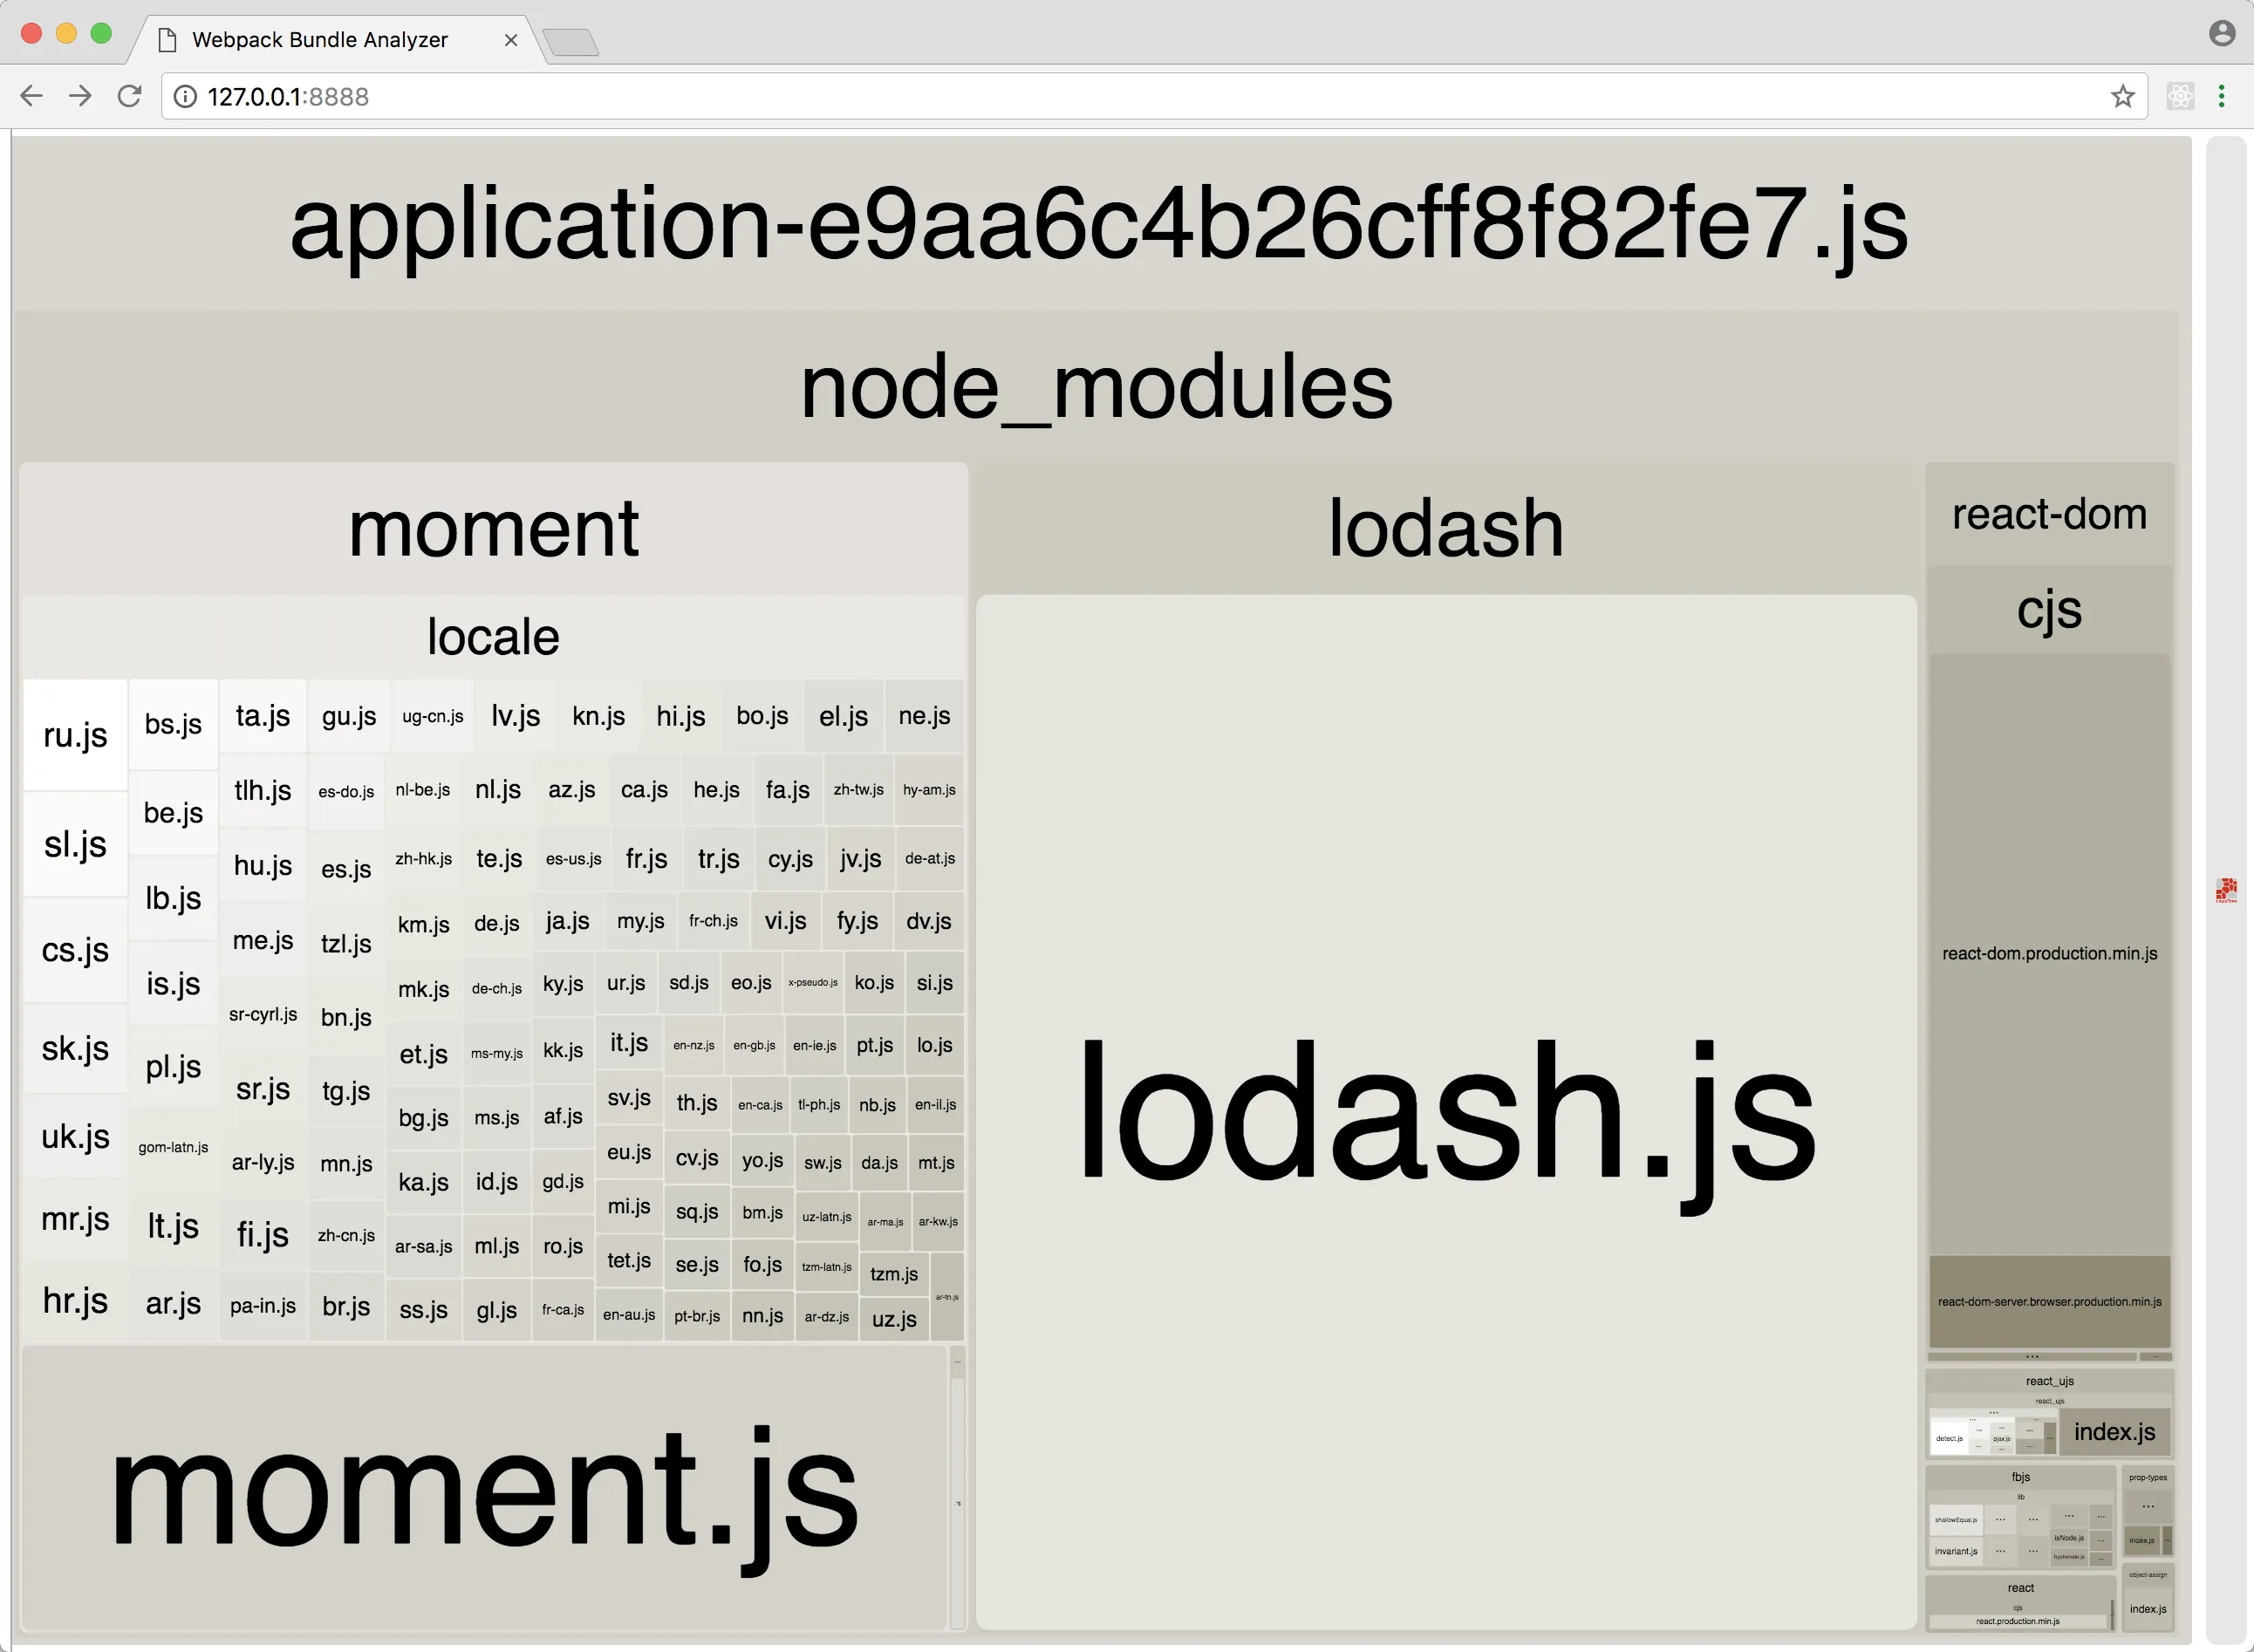
Visualizing the dependencies made it evident that moment and loads are the main reasons for JS bloat in our simple app. Bundle analyzer states that stat size of application.js is 1.17 MB. Let’s try to optimize it.
Optimizing moment.js size
It’s quite apparent that locales are responsible for the bloat. Webpack did its best to optimize the bundle size by tree shaking, but it works only for libraries implemented using ES6 modules. Moment.js was written before the concept of ES6 modules even existed so it’s no wonder that it doesn’t make good use of it and as a result, it eagerly includes all the locales when we import it. If you’re looking for a modern, modular, ES6 alternative, try date-fns.
There’s not much we can do in our code to optimize the way we import moment, but Webpack is powerful enough to allow us to ignore specific/all locales. There are two ways to do it.
Using IgnorePlugin
Edit config/webpack/environment.js and make it look like this:
const { environment } = require("@rails/webpacker");
const webpack = require("webpack");
environment.plugins.prepend(
"MomentIgnoreLocales",
new webpack.IgnorePlugin(/^\.\/locale$/, /moment$/),
);
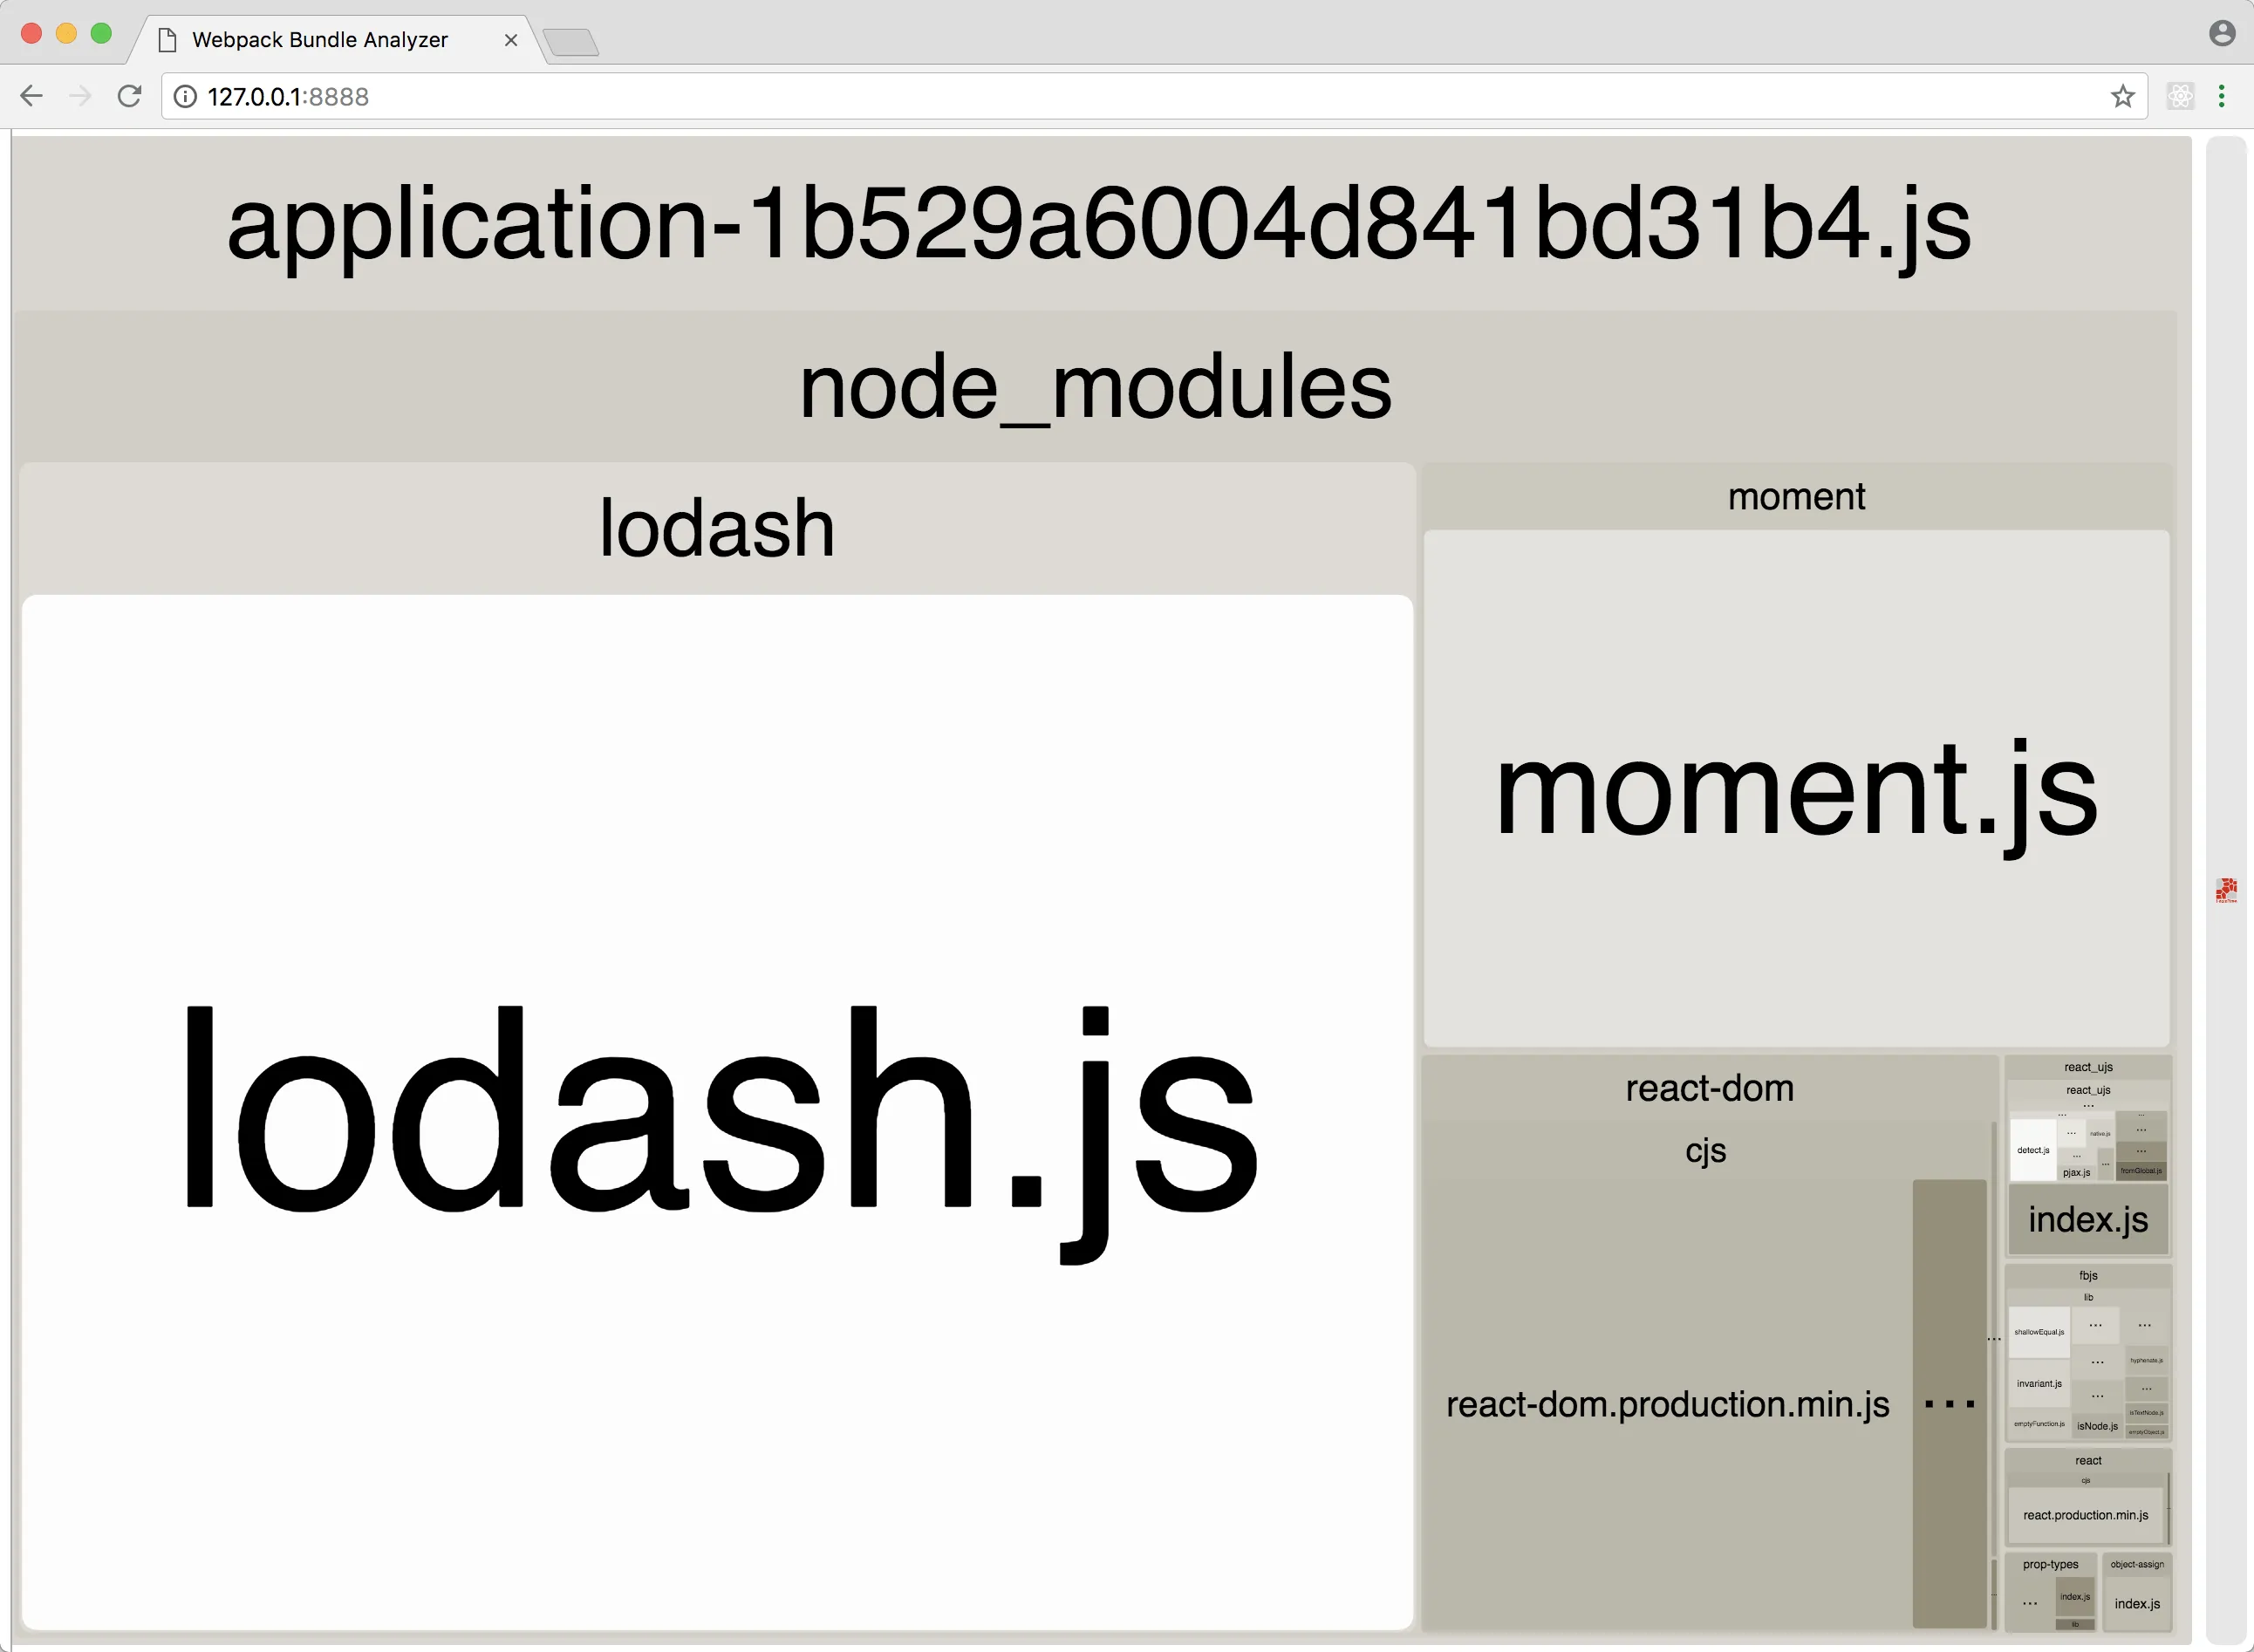
module.exports = environment;Down to 814 KB, that’s about 300 KB smaller. Nice!
With this solution, you can still import the locale you’d like to use. However, you need to do it explicitly, as the locale is no longer loaded automatically. Not ideal, let’s proceed to the second solution:
Using ContextReplacementPlugin
Edit config/webpack/environment.js and make it look like this:
const { environment } = require("@rails/webpacker");
const webpack = require("webpack");

environment.plugins.prepend(
  "MomentContextReplacement",
  new webpack.ContextReplacementPlugin(/moment[\/\\]locale$/, /en|pl/),
);

module.exports = environment;
This method results in a similar drop in size but you can additionally specify which locales you want to use up-front, so you don’t need to worry about it when importing and using the library.
Optimizing lodash.js size
Now lodash is the only obviously standing out library that needs our attention. Unlike moment.js, lodash is written in a modular way. If we import only the functions we use (instead of _ object that contains all functions), Webpack will optimize the bundle and make sure to include only the necessary parts of the library.
Importing specific functions
We could optimize imports in our component so that it could look like this:
import maxBy from "lodash/maxBy";
// ...
const winningTeam = maxBy(teamScores, (t) => t.score);
This simple operation yielded an amazing improvement: our JS bundle size is down to 396 KB!

Babel plugin
Since this is a toy project, fixing lodash imports was relatively quick, but a massive project with hundreds of React components does not have this luxury. Fortunately, we can use babel-plugin-lodash to let Babel automatically transform our imports.
yarn add babel-plugin-lodashAfter adding the plugin, all we have to do is declare our intention to use it in .babelrc file in the project:
{
  // ...
  "plugins": [
    "lodash",
    "syntax-dynamic-import",
    "transform-object-rest-spread",
	  // ...
  ]
}
That’s it! The stats will look identical, but we don’t have to modify a single line of JavaScript. Letting tools do the heavy lifting is always the preferred option.
As a side note, lodash-es library enables more elegant ES6 imports but you’ll still need to hand-pick the functions you’d like to use.
Wrapping up
Tuning Webpack and Babel configuration resulted in JS bundle size dropping from 1.17 MB to 396 KB without changing a single line of code. That’s an incredible improvement.
To make sure the process is repeatable and documented, I recommend adding a script to package.json file:
{
  "dependencies": {
    // ...
  },
  "devDependencies": {
	  // ....
  },
  "scripts": {
    "webpack:analyze": "mkdir -p public/packs && node_modules/.bin/webpack --config config/webpack/production.js --profile --json > public/packs/stats.json && node_modules/.bin/webpack-bundle-analyzer public/packs/stats.json"
  }
}
Now you can easily generate and view the stats by running yarn run webpack:analyze. Happy tuning!
You can see the final result of this tutorial on GitHub.